Showing posts with label recipes. Show all posts

Friday, August 31, 2012

A More Fun Cuppa Joe

I've been doing this for a couple of days, and I'm loving it so much that I just had to share. This is an easy, fun way to make your morning cuppa joe feel like you spent big bucks on the fancy stuff.


Brew some joe, just like always.

Pour a little milk in the bottom of your coffee mug. I use the Kroger brand vanilla almond milk, and it's the only brand of almond milk that I've found to hold a good froth. Cow's milk will, of course, froth really well, too.

Nuke your milk in the microwave for about 30 seconds.

Add a spoonful of honey to your warm milk and stir it up. You can use sugar, but honey is really yummy and better for you.

Froth up your milk and honey. We have this frother that we bought at target years ago. They are cheap and fun, so why not?

Add your coffee. This basically makes a cappuccino, but with regular coffee instead of espresso, and with honey-flavored milk, which is amazing. A true Italian may turn his nose up at my coffee cappuccino, but I'm really loving this little bit of fun in the mornings!

Tuesday, August 7, 2012

Emma's Potato Salad

I don't like potato salad. I've tried it on numerous occasions and just never cared for it at all. This summer, we were at some friends' house and they had prepared a meal for everyone. There were only a few options that were both gluten and dairy free, and one of them was the potato salad. I shrugged inwardly and put some on my plate, figuring that gross food is better than no food at all.

Much to my surprise, I LOVED this potato salad! It is so unlike any other potato salad that I've ever had. I went back for seconds... and then probably thirds. It was so good. I begged my friend Jenn for her recipe and she emailed it to me a few days later. I've made it several times since myself and also taken it to a potluck where it was a huge hit.


I asked Jenn where she got this recipe and she said that there wasn't any real source, it was just something that she and her Nana, whose name was Emma, used to whip up together. I love that, so I'm naming it Emma's Potato Salad. I hope you love it as much as I do! Here are the ingredients and directions just as she wrote them to me:

Ingredients
9 medium potatoes
9 eggs - hard boiled (dice 7, cut the remaining 2 to decorate the top of the salad)
2 stalks of celery, diced
1 med-large vidalia onion, diced
mayo (only Hellman's!) to your liking
seasoned salt to your liking
pepper

Directions
I wash and cut the potatoes to 1/2 inch diced and boil until soft, but not completely mushy soft. Just a minute less than what you would do to make mashed potatoes.
Rinse and cool potatoes slightly before mixing with eggs, celery and onion.
Put in mayo about 1/4C at a time until you get it to the consistency you like. I do not like mine to mayoey, but I also do not like it too dry.
I flavor with seasoning salt and maybe a little pepper if I am in the mood.

Reduce the recipe accordingly to accomodate how many you are making it for. If you just wanted to snack on it for a few days, I would probably use 3 potatoes.

Thursday, July 5, 2012

Homemade Clif Bars

I can't believe it's taken me this long to blog about this incredible recipe. I feel like I'm constantly telling people about it. I posted the following picture on Instagram and Facebook on Monday and was flooded with requests for the recipe, so here you go, everyone!


The original recipe that I used is from Enlightened Cooking. My recipe is pretty tweaked from the original, but I certainly can't claim to be the one who came up with this. You can easily half this recipe and do it in an 8x8 pan like the original recipe, but if I'm going to go to all that trouble, I want to make a big batch.

In a small saucepan, melt on low 1 ounce unsweetened baker's chocolate. Add:
1 cup honey
1 cup peanut butter
2 teaspoons vanilla extract 

ONLY heat this enough to melt the chocolate. If you let it cook or come to a boil, it will be too thick and your bars will be drier.

In a large bowl, combine: 
2 1/2 cups Crispix*
2 cups uncooked quick-cooking oats**
1/4 cup ground flaxseed 
1/2 cup raisins
1/2 cup finely chopped nuts or seeds (I use sunflower seeds because they are the cheapest)
A few dashes of spices (like pumpkin pie spice or cinnamon) as desired 

Combine all ingredients and stir until well-blended. Dump mixture into a well greased 9x13 inch baking dish, cover with wax paper, and press it down as hard and even as you can***. Pre cut into squares or bars and chill in the fridge for about 30 minutes to harden. Put two squares or one bar each into snack sized ziploc baggies and store in fridge.

*The original recipe calls for Rice Krispies, but be warned that Rice Krispies (and many other cereals) contain BHT in the packaging, a preservative that is known to cause cancer and disrupt hormones. I prefer to use crushed up Crispix in Josh's bars because it doesn't contain BHT, and Josh prefers the taste and texture of bars made from Crispix over Rice Krispies. I prefer something without any added sugar in mine, so I use millet puffs that I buy at our local health food store. In other words, there are several things you can use here, so figure out what works best for you.

**It is debated about whether or not oats contain gluten. Some say oats are contaminated by wheat in the fields, and others say they are contaminated in the factories where they are processed. Either way, I notice that regular oats give me the brain fog that I get from gluten, so I use Bob's Red Mill Gluten Free Oats in my bars.

***I've actually started skipping this step and taking the mixture straight from the mixing bowl to the baggies and I press them into bar shapes in the baggies. It isn't as pretty, but a lot less work.


ETA 4-17-13:
I just came across another healthy bar recipe that I am going to try ASAP:
http://wholenewmom.com/whole-new-budget/homemade-protein-bars/

I'll let you know what I think once I've made them, but they get rave reviews over there!

Friday, September 16, 2011

Homemade Kefir Yogurt

I was super nervous about how this would taste, but it is a TOTAL WIN! I'm so excited!


Please DON'T be intimidated by kefir (pronounced kuh-fear). It's INCREDIBLY easy and WAY better for you than store-bought yogurt. Kefir, technically, is meant to be drunk as kind of a really thick milk. But if you strain it a bit, you get yogurt, which I enjoy a little more, plus I get to use some of the whey from straining it, which I'll say more about at the end.

Here's what you'll need:
  • Dried kefir grains (Here are the exact ones I bought. They aren't cheap, but they're like sourdough starter and will last forever and multiply if you take care of them.)
  • Milk (The closer to raw you can get, the better. Regular store milk is fine. Organic is better. Unhomogenized organic is even better. Raw is best, but not always easy to get.)
  • Cheesecloth
  • Honey, fruit, granola, etc. (optional)
Here's what to do:
  • It takes a week or so to rehydrate the grains, and the instructions are in the box. You just put them in milk, loosely cover it, set it on your countertop (or in my case, kitchen windowsill), and change out the milk every day. Easy peasy.
  • Once your kefir is thickening well and has a good smell to it, you can pour the kefir into some cheesecloth over a bowl. Fish out the grains with a spoon. I wish I'd taken a picture of this step, but I hung my cheesecloth with a rubber band from a knob on one of my upper cabinets and kept the bowl under it to catch the drippings.
  • Let it drip for a few hours, depending on how thick or runny you want your yogurt. Mine only hung for about two hours. Side note: If you make the kefir with cream instead of milk and then let it drip longer, you'll have homemade sour cream!
  • Then, scoop it out of the cheesecloth into a bowl, add a generous amount of honey, and taste it. Super yum! It's delish just like this, but you could add fruit, granola, etc. to yum it up even more.
The watery stuff that's left in your bowl is whey. You know, like Little Miss Muffet used to eat. It's also REALLY good for you and can be used in a lot of ways. I'm going to start by using this batch to make dilly carrots, but there are a lot of other great ways to use it. Check out this article by Kelly of Faithful Provisions for some great ideas.

If you're interested in learning more about kefir, Dom's Kefir-Making Site is a wonderful, exhaustive online resource.

Monday, August 29, 2011

Simple Chicken Soup

In preparation for going on the GAPS diet (which I'll tell more about later), I've been doing a lot of reading lately about the health benefits of broth. To summarize, for those of you who may not feel like clicking on the link (although I very much recommend it), consuming homemade broth/stock:

  • Boosts immune system
  • Aids digestion
  • Increases efficiency of protein use
  • Provides easily digestible minerals, including calcium
  • Can improve symptoms of: joint pain, common cold, peptic ulcers, tuberculosis, diabetes, muscle diseases, infectious diseases, jaundice, cancer, food allergies, colic, maldigestion, inflammatory bowel disease, osteoporosis, pain and inflammation, cramps, muscle spasms, delusions, depression, insomnia, irritability, hyperactivity, anxiety, palpitations, hypertension, high cholesterol, allergies….
The homemade part is very important, and also very easy. Here's some how-to if you need it.


But, okay, assuming you have some broth on-hand (I have jars and jars of it in the freezer, and sit a new one in the fridge to thaw as-needed), this soup is really, really, really simple and nourishing and inexpensive to make.

I also try to always have on hand a roasted or boiled chicken. We usually eat it in a meal the first night and then I pick off meat as I need it from there. It's great to put on salad or in soup. Here's some how-to for roasting a chicken if you need that. It's also really, super easy and delicious.

You'll need:
Homemade chicken broth
Roasted or boiled chicken meat
Carrot
2-3 cloves garlic
Salt
Pepper

These amounts are for a personal-sized bowl of soup that I make in my smallest sauce pan. This is so much easier than having to store and re-heat a huge pot of soup every time I want a bowl. Adjust amounts depending on how many you are feeding, ideally about one carrot and 2-3 cloves of garlic per person. 2-3 cloves of garlic sounds like a lot, but it is really, really good for you, and you really don't taste it, I promise.

Directions:
Put broth in pot and bring to boil.
Cut up carrot and garlic, add to broth.
Salt and pepper to taste.
When boiling, which will be about the time you get everything else in there, reduce heat to medium and let simmer while you fix your drink.
Enjoy.

Tuesday, August 16, 2011

Easy Baked Veggies

Not to be confused with something you made in your Easy Bake oven, these veggie are both easy and baked... and delicious.


One afternoon this summer, Jude and I stopped by my sister's house and she had veggies in the oven. If you're like most of our rural friends, either you or someone you know gardens, which means that you probably have squash and zucchini coming out of your ears right now. This is an easy and delicious way to fix them. It works great as a side dish (we ate this batch with grilled pork chops), or on its own as an afternoon snack, which is how we had them at her house.

Ingredients
(Don't feel like you have to have everything here. I made mine without an onion because I didn't have an extra one, but added a bell pepper. I don't remember if my sister used potatoes or not. Feel free to improvise with what you've got.)
  • Squash
  • Zucchini
  • Onion
  • Potato
  • Bell Pepper (Warning: the green bell pepper will be bitter the next day if you have any left over)
  • Seasoned Salt (She used Cavender's, I used Lawry's; they were both delicious)
  • Oil, butter, or ghee

Directions
Preheat oven to 350.
Slice and chop up as much of each veggie as you want.
Drizzle some oil, melted butter, or ghee on a large cookie sheet.
Toss all of your veggies onto the cookie sheet and drizzle again with oil, butter, or ghee.
Sprinkle GENEROUSLY with seasoned salt. The more, the better.
Bake for 30-45 minutes, turning and stirring occasionally, until veggies are tender.

Friday, June 10, 2011

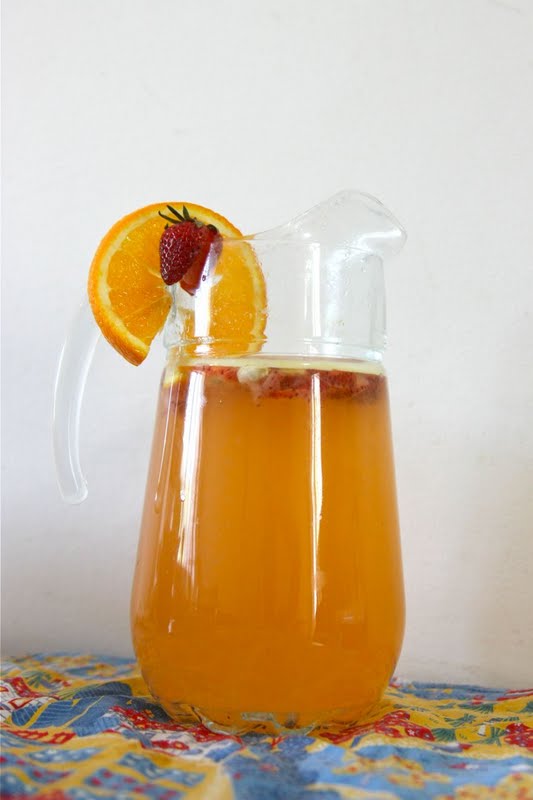
Strawberry Lemonade

I cannot even begin to describe to you my excitement a couple of weeks ago when I went to the market, rounded the corner, and suddenly everywhere I looked were piles of fresh strawberries! Josh and I had just been talking about how they should be out soon, and then there they were!

I bought a kilo of strawberries, along with several other things, and made my way home, where my darling husband was ready and waiting to make our first pitcher of Strawberry Lemonade of 2011 (yes, he's the salad, lemonade, and pie maker in our home). It was so delightfully refreshing and delicious that I knew I had to share it with you. 


The orange is an unexpected ingredient that I learned about several years ago from my friend Katie, who I'm pretty sure learned from her Great-Aunt Ethel, who is kind of a culinary legend in our hometown. She's actually written a book, From Pilot Knob to Main Street, which is part cookbook and part stories from her life. I have a copy of it myself and have really enjoyed it.

Okay... anyway... on to the lemonade...

Strawberry Lemonade

Ingredients
3 large lemons
1 juicy orange
4-5 strawberries
1/4 - 1/3 cup sugar (we use 1/4 cup)
water

Directions
1. Juice lemons and orange.
2. Slice strawberries.
3. Add juice, strawberries, and sugar to pitcher.
4. Fill pitcher with hot water.
5. Stir. Enjoy with ice.

Seriously, this is so delicious and summery! Go make some for yourself!

Wednesday, May 11, 2011

Healing Stir-Fry

We've been sick a lot since we moved back to camp and the semester started. It seems like there is a bug that just keeps getting passed around the students and the other families that live here. Inspired by the delicious Seriously Healing Soup recipe that I found at Nourishing Days, I created a new side dish that we've been calling Healing Stir-Fry.


I know this has a massive amount of garlic in it but don't run away screaming... it really isn't overly garlicky, I promise. Just give it a try. I call it "healing" because garlic and thyme are both really helpful when you are sick. Garlic is a powerful anti-viral, anti-fungal, and antibacterial, and thyme is helpful for treating coughs, congestion, and colds (you can see more about the medicinal uses of common culinary herbs here).

Healing Stir-Fry

2-3 tablespoons lard, oil, ghee, or butter
2 medium onions, halved and cut into half-rings
1 whole head of garlic, each clove cut into thin slices
1 red bell pepper, cut into thin strips
1 large carrot, cut into thin strips
2 tablespoons thyme
pinch of salt and pepper

This is so seriously simple. All you do is cut everything up, throw it all in a skillet, and sauté until the carrots are tender, stirring frequently (around 10ish minutes, I think). Enjoy!

Wednesday, May 4, 2011

Ridiculously Easy Honey Carrots

This is a great side dish that I make often because it is just so easy, healthy, and yummy. It's pictured with easy roasted chicken and cabbage salad (with a red bell pepper added to the cabbage salad).

Ingredients:
Carrots
Water
Honey

Directions:
Take as many carrots as you wish to serve and cut them up. Sometimes I cut them into thin, long strips, and sometimes I slice them like in the picture above.
Boil or steam the carrots until they are tender.
Drain carrots.
Take a big spoonful of honey and drizzle it over the carrots.
Enjoy.

See? I told you it was easy!

Wednesday, April 27, 2011

Cabbage Salad

By Joshua Caleb Hutchens, re-posted from www.gospellife.org


I know that, generally, food falls under Stacy Leigh’s jurisdiction since she is our gospodină, which is the Romanian word for housewife (or more literally, mistress of the house), but in our home, salads fall under my dominion.

So, here I want to share what will hopefully be the first of many Moldovan recipes—salata din varză, which the New American Standard Bible would translate “salad from cabbage,” but for those of you who prefer the New International Version, it is “Cabbage Salad.”

Ingredients:
•1 small cabbage or ¼ of a large cabbage, green or white
•1 medium onion, chopped
•1 large carrot, grated
•¼ cup sunflower oil (Since sunflowers are a main crop in Moldova, this is our everyday oil. They don’t even sell vegetable oil. Vegetable oil would work as a substitution, though it isn’t as healthy. Olive oil could also be substituted but the Moldovan flavor would turn Italian.)
•¼ cup vinegar
•salt
•parsley

•optional: cucumbers, tomatoes, or a bell pepper


1.Prepare all vegetables and place together in a large bowl (once we have fresh cucumbers and tomatoes this summer, we will throw some of them in as well).
2.Mix vegetables together.
3.Add oil, vinegar, and salt to taste (but be careful not to over-do it since the flavor will intensify after sitting a few minutes) and mix well.
4.Top the salad by sprinkling with parsley.
5.Let rest for at least 15 minutes so the cabbage can soak up the oil and vinegar.

Then enjoy this Moldovan salad. Fellow Kentuckians will like this with fried chicken, mashed potatoes, peas, sweet tea, and cornbread.

*Thanks goes to the Peace Corps Moldova since the basis of this recipe can be found in their 2005 cookbook.

Saturday, February 19, 2011

Gluten and Dairy-Free No Bake Chocolate Oatmeal Cookies

A few days ago, Josh and I got to craving some no bake cookies.  Or as he calls them, chocolate oatmeal cookies.  It's a long-standing point of contention between me and his family, but I figure that if this is the worst thing I argue with my in-laws about, then we're doing all right.

So I started looking online for a good recipe and found an amazing one on Becky Bakes.  I'd never been to her website before, but now I am hooked.  Her son also has food allergies, so, like me, she has to be careful when she cooks.


I did change up the recipe just a bit.  I didn't have any cocoa powder, so I substituted baking chocolate according to the directions I found here.  In case that ever gets deleted, the substitution I used was as follows:

"1/4 cup of unsweetened cocoa powder is equal to 3 ounces or 1/2 cup of semi sweet chocolate chips.  You can substitute it in recipes by decreasing the shortening by 1 tablespoon and decreasing the sugar by 1/4 cup."

Those directions were helpful because Becky's recipe calls for 4 tablespoons of cocoa, which is 1/4 cup. I didn't have semi sweet chocolate chips (c'mon, this is Moldova), but I did have some dairy-free baking chocolate.  I also used rice milk for the milk and ghee (of course) for the butter or margarine.

OH MY GOODNESS I cannot tell you how creamy and delicious that made these!  I'm sure they are awesome just with cocoa powder, that's how we've both loved them all our lives, but if you're looking to make some that are just a little extra decadent, then definitely try the chocolate substitution.

Let me just warn you, though... if you make a whole batch just for you and your husband (Jude won't eat anything that looks weird), your pants might get tight after a day or two... don't ask me how I know.

Okay, enough talking already, are you ready for the recipe?  Here it is:

GFCF No-Bake Chocolate Oatmeal Cookies

ETA:
I wanted to go ahead and write out my adapted recipe for these cookies, just in case somebody wants it the easy-peasy way. You'll notice that I also use less sugar than her recipe calls for. We found 2 cups of sugar to just be way too much.

My Messy No-Bake Chocolate Oatmeal Cookies
1/2 cup butter or ghee, minus 1 tablespoon (because you're using chocolate instead of cocoa powder)
1 cup sugar
1/2 cup milk (vanilla almond milk is super yummy in this)
1/2 cup (or 3 ounces) baking chocolate or semi-sweet chocolate chips
1/2 cup peanut butter
3 cups quick oats
2 teaspoons vanilla

Instructions
Put first four ingredients in medium-sized saucepan.
Bring to a boil and let boil 2 minutes. (Note: The less time you boil this, the gooey-er your cookies will be, and the longer you boil it, the dryer they will be. Adjust your boiling time to your preference. 2 minutes makes pretty gooey cookies when you're using chocolate.)
Remove from heat and stir in remaining ingredients.
Drop by spoonfuls onto wax paper and let cool (or eat a few with spoons if you're like us and can never wait for them to cool).


Saturday, January 29, 2011

Delicious Dairy-Free "Buttercream" Frosting

Look no further for the perfect dairy-free substitute for the thick creamy buttery goodness that you loved as a child. (Okay, who are we kidding? We still love it!) This stuff looks and tastes just like the real thing.


To be honest, I didn't invent this recipe from scratch myself. I did what I usually do: searched the internet for recipes, found one somewhere, and made some tweaks. Then when I bragged on facebook about my awesome frosting, I had a few people ask me for the recipe and I couldn't find it again... anywhere!  So this is the recipe that I used, tweaks and all.

Delicious Dairy-Free "Buttercream" Frosting

Ingredients
4 cups (about 1 pound) of powdered sugar
1/4 teaspoon salt
1/3 cup ghee
1/4 cup coconut milk
1 1/2 teaspoons vanilla
coloring (optional)

Directions
Be careful with these directions, because they are extremely complicated.  Read them carefully to make sure that you fully understand them before starting.

1. Cream ghee in a bowl.
2. Add everything else, mixing until smooth.
3. Frost cake/cupcakes/whatever.
4. Lick the bowl and beaters (or give them to your kids if you are feeling really generous).


It's that easy!  The ghee gives it a yummy buttery flavor, and the coconut milk gives it the perfect thickness.  If you are unfamiliar with the wonderful dairy-free butteryness of ghee, then you can click here to learn more.  It's very cheap and easy to make, and has proven itself indispensable in my kitchen.

Please let me know if you have any questions or if you try this recipe!

Thursday, December 16, 2010

What is Ghee?

That was my question the first time I saw it listed as a recipe ingredient.

Fortunately, there is a blog I love called The Nourishing Gourmet, and she not only helped me understand what ghee is, but she also helped me make some for myself.

Kimi explains that ghee is "basically butter that has been melted, the moisture evaporated, and the milk solids browned in the fat and strained out. This leaves pure butter fat or oil. It is the pure 'good stuff' in butter."

Look at that beautiful, pure, ghee goodness.

Okay, but why would you want to take the trouble to cook the milk solids out of butter?  Well, if you're not allergic to or intolerant of dairy, and you don't know anyone who is, then there is really no reason to.  You can stop reading now.  But if you or someone you love can't have milk, then this is going to forever change the way you cook.  You can use ghee exactly like you would use butter, because... well... it IS butter!  Kimi also points out that it has a much higher burning point than butter, so it is great for very high heat cooking.

Ghee is super simple to make, and Kimi gives great, simple, step-by-step instructions right here.  I have made it twice now from her instructions and it has turned out great both times.  One thing that she doesn't mention: possibly because it is winter and very cold in my house, my ghee had a tendency to very quickly cool off and get too thick to go through my coffee filter.  I found that I could put just a little bit in the filter at a time and leave the rest in the pot with the burner still on low.  That kept the rest of it warm enough to filter easily.

I also wanted to add that each time I made ghee, I used four 500g blocks of butter (which are just a little bit bigger than an American stick of butter) and it made almost exactly 1 liter of ghee, which is perfect because that's what size my jars are.  That sounds like a lot of ghee, but I go through it fast!

So now that you know about ghee, go check out Kimi's instructions and get to making your first batch!

Tuesday, November 9, 2010

Sylvia's Plăcinte

Mmm… plăcinte.  Having to give these up has been one of the hardest things about going gluten-free in Moldova.  The flaky crust, the warm oozing filling… you just really can’t beat a good plăcintă.  Today, I’d like to share with you the recipe that Sylvia, our school cook, uses and shared with me.

But first, let me pause for a quick Romanian lesson.  Plăcintă is singular for pastry and is pronounced “pluh-chin-tuh.” Plăcinte is plural and is pronounced “pluh-chin-tay.”  Actually, the most common translation of plăcinta is “pie,” but I am here to tell you that plăcinte are NOT pies!  They are pastries!  Let’s see some examples:

This is a pie:


My first (and possibly only) apple pie. Made to impress my starving fiancee.

These are pastries:


These are plăcinte:



You tell me which word is the more accurate translation.

Anyway… back to the recipe.  There are probably as many ways to make plăcinte as there are Moldovan gospodinele (housewives), which is why I call these “Sylvia’s Plăcinte,” and not just “Moldovan Plăcinte.”

Ingredients:
1 liter (about 4 ¼ cups) water
25 grams (or one packet) yeast
3 grams (about half a teaspoon) salt
flour*
oil
desired filling (I’ll get to this in a bit)
sugar (granulated or powdered, see step 10)

*Sylvia didn’t tell me exactly how much flour she uses because she doesn’t know.  She just adds flour until it looks right (as described in step 2).  I’ve made these once but didn’t measure my flour either.  Other recipes I’ve seen say 8-12 cups… so… use your best judgment.

Directions:
1.  Preheat oven to 400 degrees F.
2.  Combine all ingredients, adding as much flour as needed until dough feels sticky but not too dry.
3.  Cut dough into baseball-sized pieces (my description, not hers), generously flour your workspace, and roll out pieces very thinly with rolling pin.


4.  On a different workspace, cover the counter with oil and stretch dough until very, very thin.  It’s okay if it tears a little.
5.  Take ahold of the end of the dough closest to you, and bring it up and away from you to fold it in half.


6.  Place a generous spoonful of filling on one end.


7.  Fold triangularly until it is all folded up into a nice little triangular pocket.


8.  Place evenly on greased cookie sheet.
9.  Bake for 20-25 minutes, or until lightly golden.
10.  Boil sugar and water to make a glaze and brush on top while plăcinte are still warm, or simply sprinkle with powdered sugar.

I can't believe I've never taken a picture of freshly baked plăcintă.  You'll have to trust me, they are so flaky and golden and amazing!

There are several different kinds of fillings that Moldovans use in plăcinte.  The most common are potato, brînza (a soft, salty homemade cheese), cabbage (which is better than you’d think- it’s Josh’s favorite), fruit butter or jam, and pumpkin.  My favorite would probably either be apple butter or pumpkin.  Below are some instructions for making your own plăcintă fillings, borrowed from a 2005 Moldova Peace Corps cookbook, or you could just use your favorite store-bought fruit butter or jam.
Potato filling: Boil 4 peeled potatoes and 2 chopped onions.  Mash and season with salt and pepper.  Let cool.

Cheese filling: Mix 2 cups cottage or ricotta cheese, 1 egg, chopped dill, salt, and pepper.

Cabbage filling: Sauté 2 cups shredded cabbage and 2 chopped onions in oil until limp.  Season with salt and pepper.  Let cool.

Apple filling: Peel and grate 4 apples.  Sauté over medium heat with ¼ cup sugar and a sprinkle of cinnamon.  Let cool.

Cherry filling: Mix 1 pound sour pitted cherries and ¾ cup sugar.

Pumpkin filling: Boil and mash 500 grams (about 4 1/3 cups) of raw pumpkin.  Add 2 tablespoons of butter, spices (nutmeg, cinnamon, ground cloves, and ground ginger… or just pumpkin pie spice) and sugar to taste.

You can find another good plăcintă recipe at the Gourmandine blog (the link is to the google translate version of the website, since it is written in Romanian).  There, she has also posted a lot of step-by-step pictures that are similar to the way Sylvia makes plăcinte, except that she doesn’t stretch her dough out so thin and then fold it in half.  If you want to do it this way, it would be a lot easier, but your final product will just be thicker and not as flaky.

Well, I hope this is enough to get you going on some authentic Moldovan plăcinte!  If you have any questions, please feel free to comment or email me.

Friday, June 25, 2010

Beet Salad FAIL

I've posted several times now about my kitchen successes, so as soon as I realized what was happening with this salad, I knew that I had to blog about it as a total fail.

I found a delicious looking recipe for Roasted Beet Salad with Walnuts and Goat Cheese on Tasty Kitchen and decided to give it a go.  All of the ingredients are easy to find here, and I only had to substitute coconut oil for the butter to make it dairy-free.

First, I spent 30 mins cracking walnuts, and then got distracted while cooking them and they burned.  Not about to waste another 30 mins, I replaced them with some cashews that I had on hand.  No biggie.

Then, when my beets were finally ready, I started to slice them and realized they were much larger than the ones in the picture, so I decided to cube them instead.  Not as pretty, but they will still taste the same, right?  Then, I added the nuts.

The true downfall of the salad, however, came when I added the goat cheese.  The cheese that the recipe's author used is obviously a much firmer and crumblier kind of goat cheese than what I used, because when the soft cheese hit the still-warm beets, the whole thing turned into a big creamy bowl of purple goo.


Thinking that I could still salvage the salad, I went ahead and mixed up the dressing.  What the picture doesn't communicate is the smell that was radiating from that bowl.  The balsamic vinegar was just too much combined with the warm beets and goat cheese.  I managed to choke down several bites... Josh didn't even get that far.

Please don't let this deter you from trying this recipe... it really looks delicious!  Just please learn from my mistakes.

Wednesday, June 2, 2010

Moldovan Green Beans


I posted recently about my difficulties in finding a good way to season green peas, and I’ve had the same difficulty with green beans.  I’ve tried what seems like a million different ways to cook them, but they just never taste right.

There is a restaurant chain in Chișinău called La Plăcinte (pronounced "pluh-chin-tay," plăcinte means pastry) that has a traditional Moldovan menu.  At La Plăcinte they have some of the most incredible green beans that I’ve ever tasted, so I came home and set about trying to figure out how to re-create them myself.  The recipe below is the result of my efforts, and I must say that they have gotten rave reviews from all three of us!


Moldovan Green Beans

Ingredients:
  • 1 400g package frozen green beans (I know, fresh is probably better, but frozen is all I have)
  • Bacon grease
  • Olive oil
  • 1 Medium onion
  • 1 or 2 slices of bacon (The bacon I get is in long round chunks and the lady at the meat counter slices it for me, so I just use the end pieces of that.  Something thick enough to cut into chunks is best, but regular bacon strips will do too.)
  • Salt
  • Pepper
  • Sweet Paprika

Instructions:
  1. Melt a couple of heaping tablespoonfuls of bacon grease in a large skillet over medium-high heat.
  2. Empty package of frozen green beans into skillet.
  3. Generously drizzle green beans with olive oil.  Very generously.
  4. Chop onion and bacon, add to skillet.
  5. Salt and pepper to taste.  I use a LOT of pepper in this- cover the beans with pepper, stir, and then cover them with pepper again.  Sprinkle with Paprika.
  6. Sautee until dark and soft, stirring often.  To cook from frozen, this takes about 30 minutes.  Fresh would obviously take less time.  Add more bacon grease or oil if it starts to get too dry.

That’s it!  If anybody tries this, I hope your family enjoys these as much as we do.  It's definitely not the healthiest way to eat your veggies, but it is quite possibly the tastiest!


Sunday, May 2, 2010

Simple, Yummy Green Peas

I've started to notice a lot of food/recipe posts brewing in my mind lately.  Hubs says it's because I haven't been sewing or knitting lately (although I'm currently scouring ravelry for new knitting inspiration), so cooking is my new craft.  I guess he's probably right.

Okay, maybe peas aren’t the hardest thing in the world to prepare—you dump them out of the can or frozen bag into a small pot and heat them up... right?  But as easy as they seem to be, I’ve always found my peas to be lacking.  They are usually either totally bland or I try to season them and it just turns out weird.

So last night, I tried something new.  We knew that the particular brand of jarred peas that I was using had a good texture (a lot of the peas here are really tough, no matter how long you cook them), but were really salty.  Because of that, I strained the juice and rinsed them off before putting them in the pot.  Then, I knew I would need to add some liquid to them, but didn’t want to use plain water.  So I opened my fridge and there was the oh-so-yummy-looking jar of broth from the roasted chicken [insert link] that I had made just a couple of nights before.  I poured about half of the jar on the peas and brought them to a boil before turning off the burner and letting them sit while I finished the rest of dinner.

They were delicious!  Juicy and perfectly seasoned without any thought on my part about what I was doing.


Jude loved them too!

Friday, April 16, 2010

The Easiest From-Scratch Dinner Ever

Okay, maybe not EVER, but it is pretty easy.  When we arrived in Moldova, I had never been a “real” housewife before.  I worked full-time up until I had Jude, and during that time we would eat easy meals like spaghetti with sauce from a jar or frozen dinners like Skillet Sensations.  After Jude was born, I had a long and difficult recovery, and only started to feel better about the time we moved to live with our parents for 3 months in preparation for moving here.  Suffice it to say that I had no idea how to cook.  So being here has been my initiation into housewifery.  And what an initiation it has been!

This is not like living in the States, where if I’m feeling lazy I can order Chinese or run to Kroger for a pre-cooked chicken.  I even have to cook my “lazy day” meals here, or else we don’t eat.  And now I present to you my favorite “lazy day” meal: roasted chicken.


Soon after moving here, Stephanie came over and gave me a tutorial on how to roast a chicken, and, although it defies every instruction I’ve read in cookbooks, it makes delicious roasted chicken, so I’m sticking with it.  I’ve added my own touches along the way, and here is what is currently my favorite way to do it:

Roasted Chicken

Ingredients:
1 broiler chicken (the ones I get are about 1.5 kilos, or 3 pounds)
1 red apple
1 medium onion
1 clove garlic
lemon juice, or an actual lemon, I suppose
spices (usually basil, thyme, and sweet paprika)
salt & pepper
water

1.  Preheat your oven to about 375 degrees F.  Cut up the apple, onion and clove of garlic (I usually do a large clove in 3 pieces).

2.  Wash off the chicken and cut off the fat around the butt.  Make sure all of the feathers are taken care of; you don’t want any of those getting in your teeth.

3.  Put the chicken in a roasting pan and cover it all over, inside and out, with salt, pepper, and spices.  Then squirt lemon juice all over it.  If you’re using a real lemon, you could just include it with step 4.

4.  Stuff the inside with the apple, onion, and garlic.  Leave remaining apple and onion pieces in the pan around the chicken.

5.  This is apparently upside down, but I like to roast my chicken breast-side-down because it makes the breast meat a lot juicier and more flavorful.  Now pour lots of water into the pan, but not directly onto the chicken or you’ll wash off all of your spices.  I usually fill mine between 1/3 and 1/2 full of water.  That way, you have no worries of your chicken drying out, and you have some really yummy broth left over.  (Though if you notice, the chicken in the picture above is neither upside-down nor swimming in lots of broth; it was the first chicken I ever roasted, and I have tweaked my techniques a few times since then.)  You can strain the broth afterward and save it for making soups, rice, casseroles, or whatever suits your fancy.

6.  Now put the lid on, put it in the oven, and forget about it for about 1 hour 15 minutes to 1 hour 30 minutes.  The longer it cooks, the more tender and juicy it will be.

That’s it!  If you want a really easy side for this, poke holes in some potatoes, roll them in salt, wrap them in foil, and stick them in the oven around the roasting pan.  They will be ready at the same time as the chicken.  Also with this meal, I will often steam some carrots and then drizzle honey over them.

So there you have it.  That is my “easy” meal in Moldova.  Maybe someday I’ll tell you about what all goes into making more time-consuming meals like sweet-n-sour chicken or lasagna from scratch.

ETA: I just added this to a gluten-free carnival on The Gluten-Free Homemaker. You can check it out here.

Tuesday, November 10, 2009

Homemade Pizza

I have become, out of necessity, quite a cook since moving to Moldova.  One thing that I have really enjoyed preparing is homemade pizza.  It is QUITE a job here, since there are no pre-made crusts, sauces, or toppings to buy.  It takes about 2 hours, but it makes about 3 meals for the two of us, so it is worth it.  The recipe is from Betty Crocker’s big red cook book.

I start with a basic bread recipe and let it rise twice, once in a bowl and once in the pan that it will be baked in.  While it is rising, I:

-brown ground chicken breast mixed with sausage seasoning, an onion, and 2 cloves of garlic

-let the sauce simmer, which is made of whole tomatoes in sauce, tomato paste, an onion, 2 cloves of garlic, sliced mushrooms, a green bell pepper, oregano, thyme, basil, sweet paprika, salt, and a dash of cinnamon

-grate the mozzarella cheese

Then I pre-cook the crusts for about 20 minutes.  I make 2 pizzas, so while the second one is pre-cooking, I can start putting the toppings on the first one.  Then while the first one is baking, I put the toppings on the second one.  We usually start eating while the second one is still in the oven.

It is extremely delicious, if I do say so myself.  I’m looking forward to making it for my mom when we are back in the States, because she loves pizza (and all Italian food, really) almost more than life itself.  ;)